Managing Your Projects on 3Dgigs: A Comprehensive Guide
Navigating through your project’s journey on 3Dgigs is made easy with our intuitive Projects Dashboard. Here’s how you can keep track of and manage all aspects of your projects effectively.
Accessing Your Projects Dashboard
- Dashboard Overview: Simply click on the “Projects Dashboard” link in the menu to access a comprehensive view of your ongoing and past projects. This dashboard is your command center for everything project-related.

project dashboard link on 3dgigs

Understanding Your Dashboard
- Dashboard Fields: The table on your dashboard includes several key fields:
- Title: The name of your project.
- Filled?: Indicates whether the project has been assigned to a maker.
- Date: The posting date of your project.
- Listing Expires: Shows when your project listing will expire.
- Applications: Displays the number of proposals your project has received, with a “View Applications” option for detailed review.
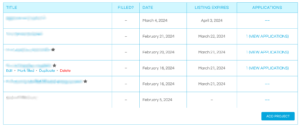
projects dashboard on 3dgigs

Managing Individual Projects
- Project Interactions: By hovering over a project title, you’ll see options to:
- View: Click on project titles to see detailed views.
- Edit: Make changes to your project details.
- Mark Filled: Indicate that a maker has been chosen for the project.
- Duplicate: Create a new project based on an existing one.
- Delete: Remove a project listing.
projects dashboard on 3dgigs
Reviewing Applications
Project Applications Page
- Review Proposals: Click the “View Details” icon next to any application to delve into the specifics of a maker’s proposal.[Screenshot Placeholder for View Details Icon]
- View Maker Profiles: Get to know your potential collaborators better by clicking on the Maker icon within an application, providing insights into their skills and past projects.[Screenshot Placeholder for Maker Profile Icon]
- Initiate Negotiation: Change the application status to “Negotiate” via the Project Actions icon to start a chat with the maker, allowing for dynamic discussion and proposal adjustments.[Screenshot Placeholder for Negotiation Process]
- Moving Forward: Within Project Actions, you can:
- Generate Product: If you decide to proceed with an application, this action creates a reviewable product based on the proposal.
- Reject Application: If the proposal doesn’t meet your needs, you can choose to reject the application.
Completing Your Project
- Review or Checkout: After generating a product, you have the option to review the details or proceed directly to checkout.[Screenshot Placeholder for Review or Checkout]
- Shipping Details: For physical projects, you’ll need to provide a complete shipping address during the checkout process.[Screenshot Placeholder for Shipping Address Entry]
- Finalizing Your Order: Follow the standard WooCommerce checkout process to complete your project transaction, ensuring a secure and straightforward conclusion to your project journey.[Screenshot Placeholder for Checkout Process]